Battery switch on travel trailer function is crucial for managing your RV’s power. Understanding how to use it safely and effectively is key to enjoying worry-free camping. This guide will walk you through the different types of switches, how to connect and disconnect batteries, troubleshoot common problems, and perform essential maintenance. We’ll cover everything from basic operation to integrating your battery switch with other electrical components, ensuring you’re prepared for any situation on the road.
We’ll delve into the specifics of different battery switch types – single, dual, and selector – outlining their advantages and disadvantages. Learn the correct procedures for connecting and disconnecting your house and chassis batteries, along with crucial safety tips to protect yourself and your RV. We’ll also explore common issues like blown fuses and power outages, providing practical solutions to get you back on the road quickly.
Finally, we’ll discuss the importance of regular maintenance and how to extend the life of your battery switch.
Understanding Battery Switch Functionality in Travel Trailers
A battery switch is a crucial component in a travel trailer’s electrical system, allowing you to manage and control the flow of power from your batteries to the various appliances and systems within your trailer. Understanding its function and operation is essential for safe and efficient use of your RV.
Battery Switch Purposes
The primary purpose of a battery switch is to isolate your house batteries from the trailer’s electrical system when not in use, preventing unwanted battery drain. This is especially important for extended periods of storage to avoid a completely drained battery. It also allows you to switch between different battery banks, if your system has more than one.
This can be useful for charging separate battery banks or for powering different systems independently.
Types of Battery Switches
Several types of battery switches are commonly found in travel trailers, each with its own advantages and disadvantages. The most common are single, dual, and selector switches. A single switch simply connects or disconnects your house battery from the trailer’s electrical system. A dual switch manages two separate battery banks (like a chassis battery and a house battery), allowing independent control over each.
A selector switch offers more control, allowing you to choose between different battery banks, or to connect both to the trailer system simultaneously. More sophisticated switches may even include a disconnect for solar panels.
Planning a trip? Don’t forget travel insurance! Seriously, it’s a lifesaver. Check out Aon travel insurance for comprehensive coverage. They offer various plans, so you can find one that fits your needs and budget. Then, once you’ve got that sorted, compare it with another provider like Aon travel insurance – sometimes different websites offer slightly different deals.
Remember to read the fine print before you buy, but getting insured is a smart move before you jet off!
Operating a Typical Battery Switch
Operating a battery switch is usually straightforward. Most switches use a simple rotary dial or lever mechanism. To turn on your house batteries, rotate the switch to the “on” or “both” position (depending on your switch type). To disconnect the batteries, turn the switch to the “off” position. Always refer to your specific battery switch’s instructions for detailed operation, as the labeling and functionality may vary slightly between manufacturers.
Improper use could lead to unexpected electrical issues.
Comparison of Battery Switch Types
| Switch Type | Advantages | Disadvantages | Typical Use Case |
|---|---|---|---|
| Single | Simple, inexpensive, easy to operate | Only controls one battery bank; no isolation between banks | Travel trailers with a single house battery |
| Dual | Controls two separate battery banks independently | More complex than a single switch; slightly more expensive | Travel trailers with separate house and chassis batteries |
| Selector | Offers flexibility to choose between different battery banks or combine them | Most expensive; can be more complex to operate | Travel trailers with multiple battery banks and complex electrical systems; allows for prioritizing battery usage |
Connecting and Disconnecting Batteries
Properly connecting and disconnecting your travel trailer’s batteries is crucial for safety and preventing damage to your electrical system. This process involves using your battery switch, a critical component for managing power flow to both your house and chassis batteries. Understanding how to use it correctly is essential for avoiding costly repairs and ensuring a safe and enjoyable RV experience.Connecting and disconnecting your house and chassis batteries involves manipulating your battery switch.
This switch typically has several positions, allowing you to isolate, combine, or individually power different battery banks. Always refer to your specific battery switch’s instructions for precise operation, as models vary. Generally, you’ll have options to connect both batteries together, connect only the house batteries, connect only the chassis batteries, or disconnect both completely.
Safety Precautions When Working with RV Batteries, Battery switch on travel trailer function
Working with RV batteries requires caution due to the potential for sparks, explosions, and corrosive acid exposure. Always wear safety glasses to protect your eyes from potential splashes of battery acid. Furthermore, ensure adequate ventilation to dissipate any hydrogen gas produced during battery operation. Hydrogen gas is highly flammable and can explode if ignited. Never use open flames or sparks near batteries.
Rubber gloves are recommended to protect your hands from acid and corrosion. If you’re unsure about any aspect of the process, consult a qualified RV technician.
Consequences of Incorrect Battery Switch Operation
Incorrect operation of your battery switch can lead to several problems. For instance, accidentally connecting a fully discharged battery to a charged one can cause a significant current surge, potentially damaging the charging system or the batteries themselves. Similarly, leaving the switch in the wrong position could drain your batteries unexpectedly, leaving you without power. In extreme cases, improper handling could lead to short circuits, fires, or even explosions.
Always double-check the switch position before leaving your RV unattended.
Battery Switch Operation Flowchart
Imagine a flowchart with four distinct boxes representing the four main steps.Box 1: Preparation: This box details preparing for the task. It would include wearing safety glasses and gloves, ensuring good ventilation, and locating the battery switch.Box 2: Switching: This box illustrates the process of turning the battery switch to the desired position (e.g., OFF, HOUSE, CHASSIS, BOTH).
It would emphasize carefully turning the switch to the correct position and noting the position for reference.Box 3: Verification: This box describes checking the voltage of each battery bank to confirm the desired connection. A simple voltmeter check would verify the batteries are either connected or isolated as expected.Box 4: Completion: This box shows the final step of completing the process and ensuring the battery switch is in the correct position before leaving the RV.
This emphasizes double-checking the switch position and understanding the consequences of improper positioning.This simple flowchart provides a visual guide to the process, ensuring safe and correct battery management. Remember, consulting your RV’s manual for specific instructions regarding your battery switch is always recommended.
Troubleshooting Common Battery Switch Issues
Dealing with a finicky battery switch in your travel trailer can be frustrating, but understanding the common problems and how to fix them can save you a lot of headaches (and potentially a dead battery on a camping trip!). This section will guide you through identifying and resolving some typical issues.
Battery switch problems usually manifest as a lack of power to your trailer’s systems, even when the batteries seem charged. Sometimes, the culprit is a simple blown fuse, while other times, the problem lies within the switch itself. Let’s explore some solutions.
Identifying Common Problems
Several issues can prevent your battery switch from working correctly. These range from simple problems like blown fuses to more complex issues with the switch’s internal components or wiring. A systematic approach to troubleshooting is crucial for efficient repair.
- No Power to the Trailer: This is the most common symptom. It could indicate a blown fuse, a faulty switch, a disconnected wire, or a problem with the battery itself.
- Intermittent Power: If you experience power coming and going, this suggests a loose connection somewhere in the system, potentially at the switch, the battery terminals, or in the wiring harness.
- Blown Fuses: Check the fuses both in the battery switch and in your trailer’s main fuse panel. A blown fuse is often a sign of a short circuit somewhere in the system, requiring further investigation.
- Switch Doesn’t Move Freely: A stiff or unresponsive switch might indicate corrosion or damage, preventing proper contact and power flow.
Troubleshooting Steps and Solutions
Before you start, always disconnect the negative (-) terminal of your battery to prevent accidental short circuits. Safety first!
- Check the Fuses: Visually inspect all fuses related to the battery switch and the trailer’s 12V system. Replace any blown fuses with fuses of the same amperage rating. If a fuse blows immediately after replacement, there’s a short circuit somewhere in the wiring – you’ll need to carefully trace the wiring to find and fix it.
- Inspect the Battery Connections: Ensure the battery terminals are clean, tight, and corrosion-free. Clean them with a wire brush and apply a corrosion inhibitor if necessary. Loose or corroded connections can prevent proper power flow.
- Test the Battery Switch: Use a multimeter to check for continuity across the switch terminals in each position (e.g., battery, off, shore power). If there’s no continuity when the switch should be conducting, the switch itself is faulty and needs replacing.
- Examine the Wiring: Carefully inspect all wiring connected to the battery switch for any signs of damage, fraying, or loose connections. Repair or replace any damaged wiring.
- Check for Short Circuits: If a fuse keeps blowing, there’s likely a short circuit in the wiring. This requires careful and methodical tracing of the wiring to locate the problem area. Often, a short circuit involves bare wires touching or a wire touching a grounded metal part of the trailer.
Testing the Battery Switch for Proper Operation
Using a multimeter is the most reliable way to test your battery switch. You’ll need a multimeter capable of measuring continuity (ohms).
- Set the Multimeter: Turn your multimeter to the ohms setting (usually symbolized by Ω).
- Disconnect the Battery: Disconnect the negative (-) battery terminal for safety.
- Test Continuity: With the switch in each position (e.g., battery, off, shore power), touch the multimeter probes to the appropriate terminals on the switch. If the switch is working correctly, you should see a low resistance (near zero ohms) when the switch is in the “on” position for the desired circuit, and a high resistance (infinity ohms) when it’s in the “off” position.
- Interpret the Results: If you get readings consistent with the switch’s position, the switch is likely functioning correctly. Inconsistent readings suggest a faulty switch.
Battery Switch and Electrical System Integration: Battery Switch On Travel Trailer Function
Your battery switch isn’t just a simple on/off switch; it’s a crucial component that manages the flow of power within your travel trailer’s electrical system. Understanding its interaction with other parts is key to efficient power management and preventing issues. This section details how the battery switch works in conjunction with other systems, how it helps conserve power, and provides wiring diagrams for common battery switch setups.
The battery switch acts as the central control point for your trailer’s house batteries. It determines whether power flows from your batteries to the trailer’s systems, or if the system is powered by shore power or a generator. It interacts closely with the converter, inverter, and your various 12V and 120V appliances. The converter changes the 12V DC from your batteries into 120V AC to power household appliances.
The inverter does the opposite, transforming 12V DC into 120V AC, often for higher power demands. The battery switch prevents the batteries from draining when shore power is available, ensuring a longer lifespan and preventing potential damage to your electrical system.
Battery Switch Power Conservation
The primary way a battery switch conserves power is by allowing you to completely disconnect your house batteries from the rest of the trailer’s electrical system. When the switch is in the “off” position, no power flows from the batteries, preventing parasitic drain from things like clocks or low-level circuits. This is especially important for extended periods of storage or when your trailer isn’t in use.
When shore power is connected, the converter takes over powering the trailer, allowing you to keep the battery switch in the off position and save battery life.
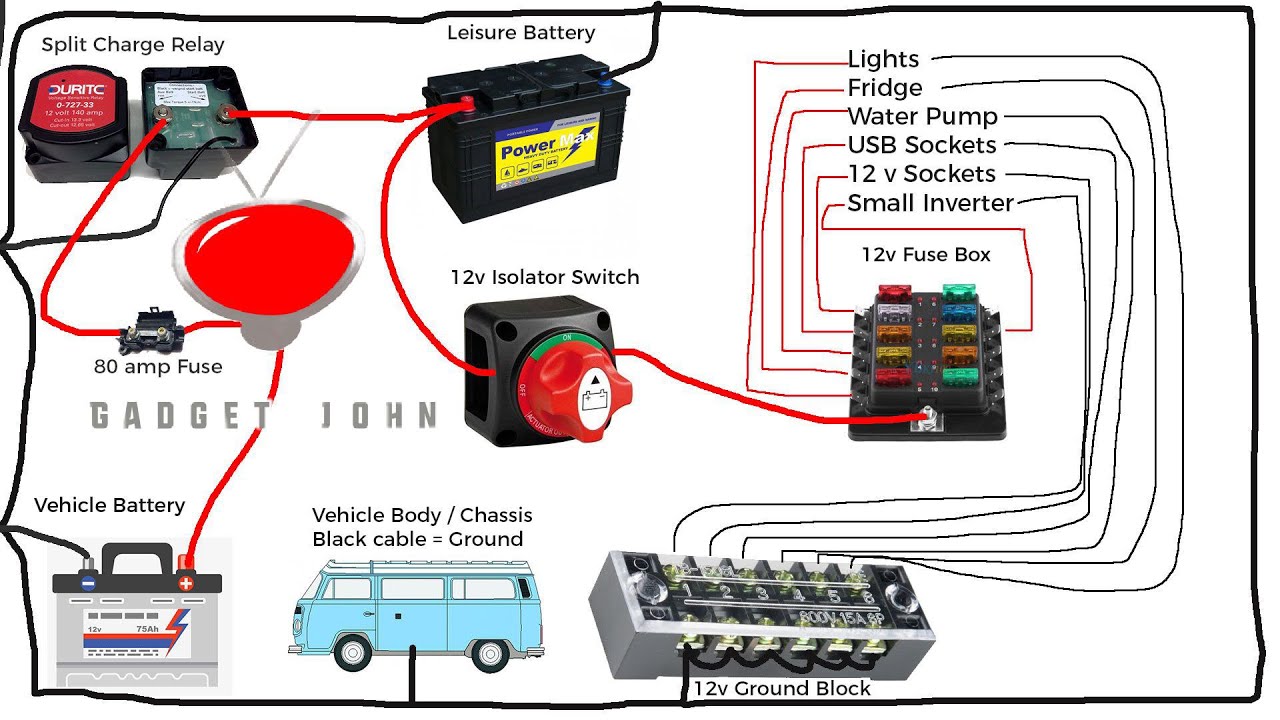
Wiring a Battery Switch
Correctly wiring your battery switch is crucial for safety and proper functionality. Improper wiring can lead to short circuits, damaged components, or even fire hazards. Always disconnect your batteries before working with the electrical system. The following diagrams illustrate typical wiring configurations. Remember to use appropriately sized wiring and fuses for your system’s amperage.
| Component | Wire Color (Example) | Connection Point |
|---|---|---|
| Positive Battery Terminal (Battery 1) | Red | Battery Switch Input (+) |
| Positive Battery Terminal (Battery 2) | Red | Battery Switch Input (+) |
| Battery Switch Output (+) | Red | Converter Positive Input (+) |
| Battery Switch Output (+) | Red | 12V Circuit Breaker Panel |
| Negative Battery Terminal (Battery 1) | Black | Chassis Ground |
| Negative Battery Terminal (Battery 2) | Black | Chassis Ground |
This table shows a simplified example for a two-battery setup with a single battery switch. Always consult your specific battery switch and trailer’s wiring diagrams for detailed instructions.
Wiring Diagrams for Different Battery Switches
Different battery switches have varying configurations. A simple on/off switch has a straightforward wiring scheme, as shown above. However, more complex switches, such as those with multiple battery banks or additional functionalities (like a “start” position for the vehicle’s battery), will require more intricate wiring. Consult the manufacturer’s instructions for your specific switch model. For instance, a switch with a “both” position allows power from both battery banks to be used simultaneously, whereas a “start” position connects the vehicle battery to the starter system for engine operation.
A diagram for a three-position switch (off, battery 1, battery 2) would add a second output from the switch, directing power from the second battery to the same points as the first battery. The main difference lies in the number of outputs and their respective switching logic.
So, you’re planning a trip? Awesome! Don’t forget travel insurance! Check out aon travel insurance for comprehensive coverage. They’ve got options for everything from lost luggage to medical emergencies. Seriously, it’s a lifesaver. And if you want another opinion before you decide, compare it with what aon travel insurance offers; sometimes different websites have slightly different deals.
Get quotes from both and pick the best plan for your adventure!
Battery Switch and Battery Types

Choosing the right battery switch for your travel trailer depends heavily on the type of batteries you’re using. Different battery chemistries have varying voltage outputs, charging requirements, and sensitivities, all of which influence the suitability of a particular battery switch. Understanding this compatibility is crucial for safe and efficient operation of your trailer’s electrical system.Different battery types have different voltage outputs and sensitivities, affecting battery switch functionality.
Lead-acid batteries are common but less efficient than lithium-ion batteries. Lithium batteries, while offering higher energy density and longer lifespan, require more sophisticated charging management systems and may not be compatible with all battery switches designed for lead-acid batteries.
Battery Switch Compatibility with Different Battery Types
The compatibility of a battery switch with various battery types hinges on the switch’s voltage rating and its ability to handle the specific charging characteristics of the battery chemistry. For instance, a battery switch designed for 12V lead-acid batteries might not be suitable for a 24V lithium battery bank. Moreover, some switches include features like built-in voltage sensing or current limiting specifically designed to protect lithium batteries from overcharging or damage.
Conversely, a simple switch designed for lead-acid might not offer the necessary safeguards for lithium batteries.
Impact of Battery Choice on Battery Switch Functionality
The choice of battery significantly impacts the battery switch’s functionality. Lead-acid batteries are generally less demanding, and most basic switches will work adequately. However, lithium batteries, due to their sensitivity to overcharging and potential for rapid discharge, require more sophisticated switches with features like:
- Voltage sensing: Prevents overcharging by monitoring the battery’s voltage and cutting off charging once the battery reaches its full voltage.
- Current limiting: Controls the charging current to prevent damage to the lithium battery cells.
- Balanced charging: Ensures that all cells in a lithium battery bank are charged evenly to maximize lifespan and prevent imbalances.
These advanced features are typically not found in simpler switches designed for lead-acid batteries. Using an inappropriate switch can lead to premature battery failure, reduced lifespan, or even fire hazards.
Examples of Battery Switch Configurations Optimized for Different Battery Chemistries
Let’s consider two common scenarios: Scenario 1: Lead-Acid Batteries A simple two-battery switch with a common ground connection is often sufficient for managing two 12V lead-acid batteries. This type of switch allows you to select either battery bank, both, or neither. Scenario 2: Lithium Batteries A more sophisticated battery management system (BMS) integrated with the switch is usually necessary for lithium batteries. This system often includes the features mentioned above (voltage sensing, current limiting, balanced charging) to ensure safe and efficient charging.
This might involve a more complex setup, potentially requiring a separate charger designed specifically for lithium batteries.
Comparison of Battery Types and Suitable Battery Switch Configurations
| Battery Type | Voltage | Charging Requirements | Suitable Switch Configuration |
|---|---|---|---|
| Lead-Acid (Flooded, AGM, Gel) | 12V (common), 6V, 24V | Relatively simple, less sensitive to overcharging (within limits) | Simple on/off switch, dual battery switch with common ground |
| Lithium Iron Phosphate (LiFePO4) | 12V, 24V, 48V | Requires precise voltage and current control, sensitive to overcharging | BMS-integrated switch, sophisticated charging system |
Mastering your travel trailer’s battery switch is a fundamental skill for any RVer. By understanding its function, proper operation, and common troubleshooting techniques, you can ensure a smooth and enjoyable camping experience. Remember, safety is paramount when working with batteries and electricity. Regular maintenance and preventative care will keep your system running efficiently for years to come, maximizing your time spent exploring and minimizing time spent on repairs.
So, get out there and enjoy the open road!
Question & Answer Hub
What happens if I leave the battery switch on all the time?
Leaving the switch on constantly can drain your batteries, especially if there’s a parasitic draw from something in your RV. It’s best to turn it off when not using the RV for extended periods.
Can I use any type of battery with any battery switch?
No, some switches are designed for specific battery types (e.g., lead-acid vs. lithium). Check your switch’s specifications and your battery’s compatibility before connecting.
My battery switch is hot to the touch. Is this normal?
No, a hot battery switch indicates a problem, possibly a loose connection or a high current draw. Turn it off immediately and check for loose wires or other issues. If the problem persists, consult a professional.
How often should I clean my battery switch?
Inspect and clean your battery switch at least once a year, or more frequently if you’re in dusty or humid environments. Use a wire brush and a battery terminal cleaner to remove corrosion.
